- Testing pure functions
- Testing components
- Using Jest snapshot tests
- Mocking dependencies
- Getting code coverage
重点内容,着重说明
本章内容重现第7章,第9章代码。
¶Testing pure functions
单元测试会从一个纯函数入手,然后逐步深入。
纯函数的对于给定的一系列入参,总是返回相同的结果。纯函数取决于入参,它不会改变入参的值,也不改变任何外部变量。
¶Creating a basic pure function test
我们将创建第一个单元测试对Form.tsx的函数required进行测试:
- 创建单元测试文件
Form.test.tsx,对Form.tsx进行测试。
test.tsx后缀是一个重要标志,表示Jest会自动查询次后缀的文件并执行。按照约定和习惯,和被测试的文件前缀对应。如这里的Form.test.tsx。
- 导入我们希望测试的函数,包括TypeScript类型参数值:
1 | import { required, IValues } from "./Form"; |
- 使用
test函数开始我们的单元测试:
1 | test("When required is called with empty title, 'This must be populated' should be returned", () => { |
这里的test函数接收两个参数:
- 第一个参数是告诉我们测试的内容,它会输出到控制台中。
- 第二个参数是一个箭头函数,包含我们的测试
- 我们需要调用
required函数进行测试:
1 | test("When required is called with empty title, 'This must be populated' should be returned", () => { |
- 最后一个任务,检测结果是否是我们期望的:
1 | test("When required is called with empty title, 'This must be populated' should be returned", () => { |
这里链式调用了toBe来检测结果期望值。
toBe是Jest matcher检测函数中的其中一个。更多可参考 这里
- 运行命令进行单元测试:
1 | npm test |
该命名启动后进入watch mode。意思是每次更改代码,它都持续运行检测更新。

- 如果更改期望值,则测试会报错:
1 | expect(result).toBe("This must be populatedX"); |
当报错文件后,Jest会自动执行测试,并打印信息到控制台。如下:

Jest给出的错误的有用信息,它告诉我们:
- 哪个测试失败了
- 实际期望的值是什么
- 哪行出错了
这些信息帮助我们快速处理测试失败问题。
- 更改为正确的值:
1 | expect(result).toBe("This must be populated"); |
当我们保存更改后,测试通过了。
¶Understanding Jest watch options
Jest在执行测试后,会提供给我们下面一些选项:
1 | Press f to run only failed tests. |
这些选项提供了可以特定测试的执行。
¶Adding structure to unit test results
随着单元测试实现的增加,为了易读性需要添加一些结构处理结果。Jest提供了一个describe函数对测试结果进行分组。使得对测试结果更易读。
重构原来的代码部分:
1 | describe('required', () => { |
describe函数接收两个参数:
- 第一个参数是组名。
- 第二个参数是一个箭头函数,包含要执行的测试内容。
保存文件后,测试自动执行,输出内容如下:

¶Testing components
对组件进行单元测试是个挑战,因为一个组件会依赖浏览器DOM和React库。
¶Creating a basic component test
我们对组件测试,从ContactUs表单入手:
- 首先在
src创建一个ContactUs.test.tsx文件。 - 因为
ContactUs组件使用了ReactDOM进行渲染。导入相应ReactDOM:
1 | import React from "react"; |
- 我们需要模拟表单提交事件,因此导入
Simulate函数:
1 | import { Simulate } from "react-dom/test-utils"; |
- 导入测试的组件:
1 | import ContactUs from "./ContactUs"; |
- 导入表单的提交结构数据:
1 | import { ISubmitResult } from "./Form"; |
- 创建我们的第一个Jest测试函数,并分组:
1 | describe("ContactUs", () => { |
- 测试的第一个实现是创建DOM:
1 | describe("ContactUs", () => { |
首先,创建一个div容器标签,将ContactUs组件渲染进去。另外再创建onSubmit属性,它返回success。最后一行则清理DOM元素。
- 接下来,引入表单内容,并提交:
1 | ReactDOM.render(<ContactUs onSubmit={handleSubmit} />, container); |
这一步描述了:
- 使用了
querySelector函数,获取表单元素。 - 使用Jest的
expect函数检测表单不为null,not和toBeNull为链式组合。 - 通过模拟器
Simulate进行表单提交事件。使用了!告知TypeScript编译器form不是空的。
- 最后检测错误信息并展示:
1 | Simulate.submit(form!); |
这一步描述了:
- 使用了
querySelectorAll获取错误的DOM元素。 - 使用
expect进行校验
- 执行单元测试后,结果输出:

¶Improving our tests with react-testing-library
react-testing-library是一系列测试工具集。
¶Installing react-testing-library
首先安装该工具:
1 | npm install --save-dev react-testing-library |
¶Removing CSS class references from our test
- 导入相应的函数:
1 | import { render, cleanup } from "react-testing-library"; |
- 直接使用
render函数进行组件的渲染,如下:
1 | test('When submit without filling in fields should display errors', () => { |
我们再次获取了DOM容器,不过这次是通过getallByText函数获取引用部分。
- 然后获取错误的span元素长度:
1 | Simulate.submit(form!); |
- 最后一步,我们需要清理DOM元素的内容。相比
ReactDOM.unmountComponentAtNode。我们在测试外部执行清理操作。完整的代码如下:
1 | afterEach(cleanup); |
测试自动执行后,发现所有测试已通过。
¶Using fireEvent for user interaction
接下来,需要测试用户真正的行为。
- 首先添加
fireEvent函数:
1 | import { render, cleanup, fireEvent } from "react-testing-library"; |
- 继续添加
getByText函数对渲染函数render进行解构:
1 | const { getAllByText, getByText } = render(<ContactUs onSubmit={handleSubmit} />); |
这里把container变量移除了,因为不再需要用到。
- 获取
Submit按钮,并使用fireEvent触发按钮的点击。
1 | const {getAllByText, getByText} = render(<ContactUs onSubmit={handleSubmit} />); |
测试后结果通过了。
¶Creating a second test for a valid form submission
我们已经领会了如何编写一个健壮的测试。接下来测试表单填写不正确的错误情况。
- 新建一个测试:
1 | describe('ContactUs', () => { |
- 以相同的解构方式渲染组件:
1 | test('When submit after filling in fields should submit okay', () => { |
现在:
- 需要
container对象,以检测有没有错误信息 - 需要
getByText函数,定义Submit按钮 - 需要
getByLabelText函数获取输入内容
- 通过
getByLabelText获取name输入。之后检测name是否存在:
1 | const { container, getByText, getByLabelText } = render( |
- 模拟用户输入内容。这是使用了
change事件:
1 | const nameField: HTMLInputElement = getByLabelText("Your name") as HTMLInputElement; |
这里模拟用户输入了Carl。
这里显示指定了nameField的类型为
HTMLInputElment以告知编译器,避免编译错误。
- 对于邮箱的输入类似:
1 | const nameField: HTMLInputElement = getByLabelText("Your name") as HTMLInputElement; |
这里模拟用户输入了carl.rippon@testmail.com.
- 然后提交表单:
1 | fireEvent.change(emailField, {target: {value: 'carl.rippon@testmail.com'}}); |
- 我们的首要任务是验证没有错误出现。不幸的是,我们不能使用
getAllByText函数,它会查找最少一个元素,我们的情况是希望没有错误出现。因此,测试前转换一下div标签,添加上:
1 | {context.errors[name] && context.errors[name].length > 0 && ( |
给div一个data-testid属性。
- 回到测试。现在可以定位到错误
div的元素应该是null的。
1 | fireEvent.click(submitButton); |
执行测试后,所有测试通过了。
有没有不引用data-testid的实现?用户不希望看到或不关心data-testid这个属性,这显然违背我们的初衷。
¶Using Jest snapshot tests
快照测试,是指Jest会将渲染的所有元素和属性,和前一个渲染组件的快照进行比较。如果没有差异,则测试通过。
我们将使用快照测试的方法,来校验ContactUs组件是否渲染OK。
- 在
ContactUs组里面创建一个Renders okay的测试:
1 | describe("ContactUs", () => { |
- 添加下面行实现快照测试:
1 | test('Renders okay', () => { |
快照测试非常简单。我们将DOM节点和expect函数期望进行比较,然后触发toMatchSnapshot函数检验。
当测试执行后,可以从控制台看到快照已经被写入 1 snapshot written。
- 我们会发现,在
src目录,包含有一个__snapshots__目录。进入目录可以看到有一个ContactUs.test.tsx.snap文件,文件内容如下:
1 | // Jest Snapshot v1, https://goo.gl/fbAQLP |
在这份代码片段,某些内容是被剔除了的。但保留了主要信息:toMatchSnapshot函数,将container中的每个DOM节点(包含attribute)作了一份拷贝。
这种测试严重耦合在我们的实现上。任何DOM结构或属性的改动都会中断我们的测试。
- 例如,
Form.tsx中,我们在Form标签内再添加一个div标签。
1 | <form ...> |
当测试执行后,我们可以确定测试被打断了。Jest将前后改动的不同显式了出来。
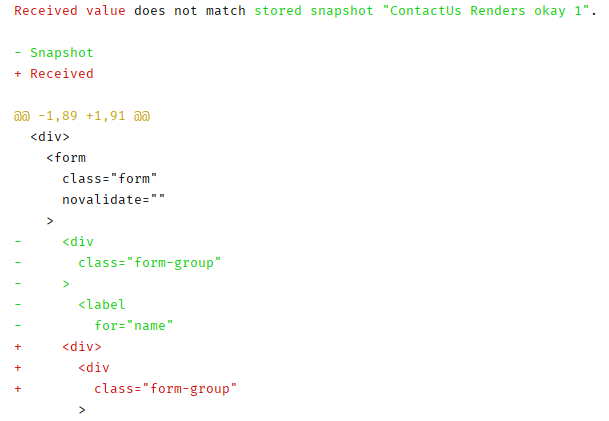
- 当然这是合法的改动,我们可以键入 U 让Jest更新快照。

那么,快照测试是好事还是坏事?他们是不稳定的因为它紧紧耦合了一个组件的实现。然后,它们也非常容易实现,当出现问题时,Jest会高亮问题所在让我们高效地修正问题。如果你们项目需要,值得尝试。
¶Mocking dependencies
模拟组件的依赖可以使得组件更容易测试。然而,如果模拟的数据太多,测试就真的代表了现实场景了吗?
对于mock什么的测试是非常难写的。它会有很多层概念。例如mock的是REST API、mock的是事件、mock的是组件…
本小节仅仅介绍REST API的mock调用测试。在此之前,首先介绍mock的特性。
¶Using a mock function in Jest
我们将继续提升表单的测试内容,添加额外的检查,以确保表单输入出现错误时,提交的处理不会执行。
- 回到原来的
ContactUs.test.tsx的第一个测试,将之前手动创建的一个handleSubmit函数,更改为一个mock函数:
1 | const handleSubmit = jest.fn(); |
测试执行后,运行正常。
- 现在提交时一个mock,我们可以检测它是否被调用了:
1 | const errorSpans = container.querySelectorAll(".form-error"); |
相比从前的写法,不仅简化了submit函数,还额外检查了提交处理是否执行。
我们继续来到第二个测试的实现中,它会检测一个合法的提交是否ok。
- 将它的
handleSubmit也更改为jest mock 函数:
1 | const handleSubmit = jest.fn(); |
- 这里的表单肯定被提交处理了,我们需要验证的是它提交了多少次:
1 | const errorsDiv = container.querySelector("[data-testid='formErrors']"); |
测试执行后,pass了。
- 还有另外一种非常实用的方法。我们知道了提交请求已经被处理了,但不能确定参数是否正确?这里可以使用
toBeCalledWith来检查:
1 | expect(handleSubmit).toBeCalledTimes(1); |
测试再次pass了。
通过使用mock函数处理,可以对有价值的数据进行校验审查。
¶Mocking Axios with axios-mock-adapter
现在移步到第9章的代码部分。
我们将测试post请求得到的渲染内容是否正确。我们将mock REST API数据进行测试。
- 首先添加依赖包:
1 | npm install axios-mock-adapter --save-dev |
- 然后安装
react-testing-library:
1 | npm install react-testing-library --save-dev |
- 该项目早已经有一个测试文件
App.test.tsx了。我们删掉已有的测试代码。 - 然后倒入额外的测试包,如下:
1 | import {render, cleanup, waitForElement} from '@testing-library/react'; |
- 添加清理工具,每次测试后进行清理。
1 | afterEach(cleanup); |
- 分组,描述测试:
1 | describe('App', () => { |
箭头函数标记了async。因为我们最终是一个异步请求的测试。
- 第一步要做的是mock REST API:
1 | test('When page loads, posts are rendered', async () => { |
在onGET方法上模拟HTTP的返回内容。
- 接下来检查请求后渲染的内容是否正确。要达到该目的,我们在
App.tsx的列表标签添加一个额外的data-testid属性,用作测试:
1 | {this.state.posts.length > 0 &&( |
- 回到原来的测试,对渲染的内容进行解构:
1 | mock.onGet('https://jsonplaceholder.typicode.com/posts').reply(...) |
- 我们需要检测渲染的请求是否正确。但由于是异步的,我们需要等待请求。可以使用
waitForElement函数处理:
1 | const {getByTestId} = render(<App />); |
waitForElement函数接收一个箭头函数作为参数,返回我们需要等待的元素。
- 接下来我们可以使用一个快照检测post的内容是否正确:
1 | expect(postsList).toMatchSnapshot(); |
- 在测试执行之前,修改一下
tsconfig.json文件。让TypeScript编译器知道我们使用了async和await:
1 | { |
测试执行后,快照被创建。查看快照后,我们可以看到请求返回了渲染的内容,其中包含了两个条目。
¶Getting code coverage
覆盖率会告知我们UT对代码的覆盖情况。我们在编写UT的时候,希望知道哪些代码还没测试的,哪些通过了,以方便进行跟踪。
Jest带有一个覆盖率工具,以上一节的代码为例。
- 要使用Jest的覆盖率工具,需要添加新的脚本:
1 | "scripts": { |
- 然后运行脚本:
1 | npm run coverage |
一会会在控制台输出测试覆盖率统计信息:

- 在项目目录结构中,可以看到添加了一个新的
coverage文件夹,包含一个子文件夹lcov-report。里面有一个index.html文件,打开文件可以看到更加详细的统计信息。 - 我们可以点击链接,查看代码的覆盖情况。
¶Summary
本章介绍了Jest测试的一些常用函数的使用。譬如expect、toBe,用于验证数据。
还介绍了如何对组件进行解构测试,通过getByText和getLabelByText获取组件的元素信息。
还学习了使用waitForElement函数处理异步事件和请求信息。
其中讨论了快照的测试情况,它会中断我们的测试,我们可以更新快照以跟踪代码的实现。
对应一些异步的请求,我们可以使用mock的方式进行模拟。我们引进了axios-mock-adapter,并介绍了如何简单的测试异步渲染的内容。
最后介绍了代码覆盖率工具的使用。
除此之外,还有两个常见的测试框架:Jasmine和Mocha。Jest的优势在于它已经集成在create-react-app的命令中了。当然你也可以替换这两款的测试框架。
还有另一个强大的测试框架Enzyme。它是基于Jest的实现。